Sunday, February 5, 2012

Iridium AxcessPoint Mail & Web

Application: iPhone, iPad, iPod Touch
Function: Iridium Satellite WiFi
Rating: ****
Cost: Free

Sailors at sea used to be disconnected and isolated from family, friends and business ashore. The satellite communications systems have changed all of that. One company that has been at the forefront of satellite telephone communications is Iridium. Most people know it as a satellite telephone company. They have been in business for years and have recently added products for tracking and monitoring, data and voice services, modems and modules for personal tracking and monitoring systems.

The Iridium Axcess point will literally create a WiFi hotspot anywhere in the world. The Axcess point connects to your Iridium satellite phone with a USB connection and allows you to access email and the Internet. The two phones that it works with are the Iridium 9555, about $1000.00 and the Iridium Extreme, about $1500.00.  You will also need a subscription and data services. There are usage charges that are billed per minute which start when you connect to the Internet. This is, at last, an affordable way to wirelessly connect your iPad, iPhone or laptop to the Internet anywhere in the world. A basic Iridium satellite phone will cost  you around $1000.00 The Axcess point will run another $175.00.

The AxcessPoint Mail and Web app will seamlessly connect your iOS device to your Iridium Axcess point wirelessly. You can then send and receive batch emails and access a low band Internet connection.  You will also be able to download weather data and GRIB files to use in weather programs like Weather 4D or iNavX.

Login with your user name and password for your Iridium email and Internet account.

A few easy setup screen allow you to make the connection with the Iridium Axcess point or modify the configuration setting and trouble shoot the connection.


Additional setting for the servers and ports. It looks pretty straight forward and should be pretty much plug and play.


This system is fairly new and I do not have any world traveling plans at this time.  I wish I had $1500 to spend and a trip planned to the Caribbean so I could give it a try.  Does anyone have any experience with the Iridium Axcess point?

Thursday, February 2, 2012

iNavX Part 2: Chart Display and Waypoints

This is part two of a tutorial for the marine navigation app iNavX. I have owned the app for about a year and have explored most of its functions and features.  Each new release seems to brings more features and added functionality.

In this post I want to cover the details and functionality of the Chart display interface and show how to create and edit Waypoints.
 
Chart Interface:

The chart interface contains a series of banners and bars to facilitate navigation around the app. These are overlayed on the chart that you presently have selected for navigation. On the bottom of the screen you will find soft keys for Charts, Waypoints, Routes, Tracks, Instruments, Forecasts and Guide.  On the top you will find a compass and instruments banner. Other navigation features on the screen are a + and - sign for zooming in and out of the displayed chart.

An icon in the middle right side of the screen has two blue arrows.  This allows viewing of the chart in full screen.  Tapping this will make the top menu banner and the bottom soft keys disappear, hit it again and they return.

On the top left side of the instrument banner you will also see a small blue dot with a greater than sign.  Tapping this allows you to either display or not display the compass and instrument banners. On the upper right side of the instrument banner is an lower case i in a gray dot.  Selecting this allows you to bring up the settings window for the instruments as shown in the image to the left.

In the instrument banner you can swipe left and right with your finger to see additional instruments. Multi touch functions of pinching in and out will zoom the display in and out.


On the top right side of the gray chart banner you will see a gear icon.  Selecting this will take you to the chart display settings. Here you can modify viewing, position and color of many items on the chart display.

Settings for Icons, Velocity vectors, night vision, waypoints, routes and tracks can all be set.

The "Long Tap New Waypoint" feature can be turned on or off here also.


In the lower right side of the display there is another lower case i, selecting this will give you information about the chart on display.

Here you can select the chart options for removal, updating, emailing, Tweeting, printing and opening the chart as a PDF file.


Waypoints:

Waypoints are the building blocks of navigation and the routing function within the app. In iNavX there are several ways to create waypoints.

The first is to simply tap the chart once where you want to place a waypoint. A small window will then pop up with options of More Detail, Goto, Zoom In, Zoom Out and Maps. On the upper right corner of the window you will see a green waypoint maker icon. To place the waypoint at this location tap this icon. You will then notice that the waypoint will appear on the screen with a name like WP0001. If you want to move it simply tap the waypoint name on the screen until it highlights grey and then move it around to where you want it. Tapping it a second time will bring up a menu to go to the waypoint, add it to a route, edit it, zoom in and out or map it.

Another way to create a waypoint is the use the "Long Tap New Waypoint" function. This has to be enabled in the chart view setup by selecting the gear icon in the top right of the display. To use the function simply tap and hold for 2 seconds and a new waypoint appears on the chart.

This may seem like a lot of detail but it will become second nature when you start adding waypoints and building routes.

The third way to create a waypoint is to hit the Waypoints soft key at the bottom of the display. The Waypoints screen includes Import/Export, Remove All Waypoints, New Waypoint and Port Search. On the bottom you will see a list of waypoints.

Import/Exports is a way to save or retrieve your waypoint and routes with your X-Traverse account. Your email and password for your X-Traverse account must be entered in the Account view under Preferences. You will need an internet connection to transfer the data to and from your account.

Remove all waypoints is pretty self explanatory. Selecting this will wipe out all your waypoints. Your are prompted again asking if you want to remove them, if so, select "Yes".

The New Waypoint selection will create a new waypoint near your present position. This new waypoint "pop up box" includes several options.

You can change the waypoint name by selecting the Name field and typing the new text. Actual latitude and longitude can be entered if you know the GPS coordinates.  A short description can also be added.  Hit the Position button to use your current position. The Lock button allows you to lock it from deletion until unlocked.  Show can be switched on or off to display the waypoint on the chart. The Arrival button allows you to set the arrival distance setting. If this waypoint is used in a route and you are within the arrival distance the app will advance to the next waypoint in the route.

Scroll to shows the waypoint on the Chart view display. The Camera icon in the upper right corner allows you to take a picture or use a picture from your devices camera roll and attach it to the waypoint. Open in Maps will bring up the waypoint and allow you to view it in Google satellite, street maps or both. You will need an Internet connection to display the Google maps.

The Goto Button, when selected, starts the navigation from your current position to the selected waypoint. iNavX shows a solid blue line on the chart display and shows the bearing, distance, crosstrack error and time to go in the instrument banner on the top. 

Another great feature on the Waypoints page is Port Search.  Here you can search for a marinas, points of interest, resorts and navaids. Selecting the Position button on the top of the page will list all locations within 50 miles. This feature will only work with the Navionics charts. The NOAA charts will not have this data. The data base is local so no Internet connection is needed for the Port Search.

As you can see, iNavX has a very full featured chart display and waypoint functionality. They seem to have thought of everything.  You can see why it is one of the most popular charting and navigation apps out there.

Next time I will cover routes and tracks. Stay tuned!

Saturday, January 28, 2012

iNavX - Getting Started

The most popular post on my blog last year was, iNavX.  It was the most searched for and read post during 2011. It is not hard to figure out why, iNavX was one of the first marine navigation apps out there for the iPhone and the iPad.

iNavX continues to to update the app and make needed improvements to take advantage of all the iPad's capabilities.  I plan on writing a series of articles in the next few weeks to showcase this great app.  I originally wrote a iNavX post over a year ago and much has changed with the app since then.

Some may shy away from the app because it will cost you $49.99. Don't let that stop you from buying it if you are a serious marine navigation nut like me.  It is much more than just a charting app as we will find out.  Some other added features you won't find in other apps are AIS, NMEA 0183 and 2000 data, anchor alarm and auto pilot control.

Lets re-visit some of the features of this great app:
  • All NOAA RNC marine charts free to download.
  • Large chart store X-Traverse with a variety of charts. Charts include CHS Canada charts, Navionics Gold charts, Fish'N'Chip charts, HotMaps, NV. Verlag charts, Hilton's Fishing charts, TRAK Canada lakes fishing maps and Solteknik European waters charts.
  • Map and satellite overlays.
  • Full line of instruments to display in digital or analog style.
  • Instruments types for location services, NMEA 0183 and NMEA 2000.
  • WiFi capabilities receive and send data over TCP/IP.
  • Ability to email position.
  • Create waypoints and routes.  Import and export waypoints and routes including KML (Google Earth) and GPX formats.
  • Export tracks to email or Facebook via X-traverse account.
  • Track Log recording.
  • Ability to measure bearing and distance. 
  • Weather forecast Grib files and tides.
  • On screen compass and instrument bar.
  • Multi-touch gesture controls of screens.
Let get started using this great app.

1.  First download the app from the iTunes Store. You will need an iTunes account to make the purchase. I would suggest downloading it to your iPad if you have one. The larger form factor of the iPad is great for viewing the charts.  The iNavX app will work on the iPad, iPhone or iPod Touch with iOS 4.2 or later.

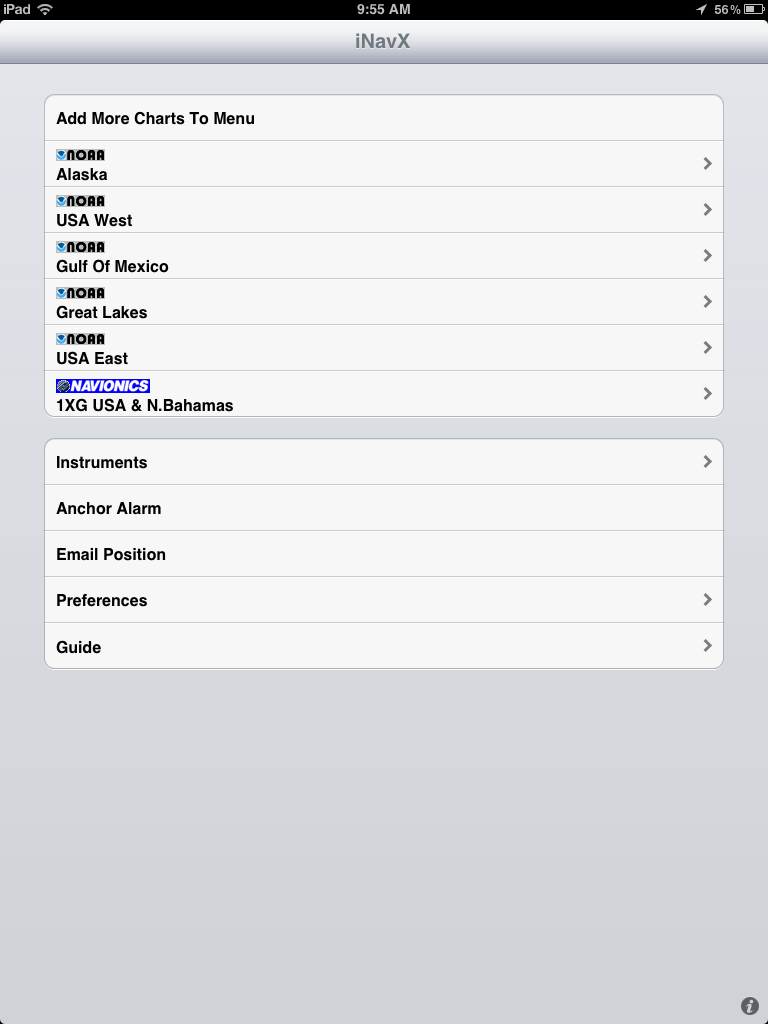
2.  Downloading Charts is fairly easy. iNavX allows you access to all the NOAA RNC charts for free. These are the most common charts used for coastal navigation. To download charts select a Chart Region to download. The NOAA charts for Alaska, USA West, Gulf of Mexico, Great Lakes and USA East are available.
This is the NOAA USA East chart list. Simply select one of the charts that you wish to download. You will then be asked to download the chart or download all "USA East".
If you want all the charts, go for the download all. If you are just interested in the one chart you selected, select "Yes".
The charts that you have downloaded will now show up in bold. 

There are three indications at the top of the chart display.
The magnifying glass will allow you to search by number or name. The Triangle will show charts that intersect with your position. The Clock will show you the most recently opened charts.

If you want additional charts other than the free NOAA charts you can purchase these through X-Traverse. This process is complicated, so follow below.

You will need an X-Traverse account to purchase and access your charts. This account will cost you $10.00 per year and allows you access to your charts through the iNavX app. Access to Grib weather files and transfer of waypoints and tracks can also be done through your account. 

Once you have your X-Traverse account you can then purchase additional charts. Make sure you purchase the iPad charts for download. They offer a wide range of Navionics, CHS Canadian Charts, Fish"N"Chips, HotMaps, NV Verlag and Hilton fishing charts.

To access and download your purchased charts in your iNavX app you need to add your X-Traverse account information to the app. Go to "Preferences" and select "X-Traverse Account". This is where you will add your email and password for your account.

Next select "Show Account Information" this will retrieve your account info showing you what products you have activated for use by the iNavX app.
You will next need to go back to the Charts list and select "Add More Charts to Menu". The next menu should show you the list of charts. The charts you purchased should show up as bolded. I purchased Navionics Gold Marine Charts 2011.  Select this and another display will show the charts in that package. Turn "ON" the charts you purchased.

Go back to the iNavX menu and select the chart you turned on to view you charts. Select your chart title and download you your iPad.

My next post will cover the charts display and navigation screen features for iNavX.

Monday, January 23, 2012

Clouds, but it's not Weather!

Application: iPad
Function: Cloud Computing Apps
Rating:*****
Cost: DropBox, CloudOn and OnLive have free options, Splashtop Desktop is $4.99

This post is a bit of a departure from the marine apps normally reviewed. I thought it was applicable for some of us who need to do a little work while on the road.  When you talk to most boaters about clouds they are probably thinking about storms or weather. In this case we are talking about the virtual computing Cloud. As an avid boater, I sometimes have to do a little work while I play.  The Cloud and some additional apps helps me do this with ease.

I have been trying to wean myself off of the Microsoft Office programs and use the iOS apps to do my work. There are some times when I still need to edit or modify a Word or Excel document.  There are a couple of apps that allow this whole Cloud thing to happen and work for me.

The first is Dropbox, and it is exactly what it sounds like. It is a place to store files and get access to them from anywhere you are. Dropbox stores them on their secure server with various data plans.  The Dropbox program has to also be installed on your PC, Mac or Linux machine.  You can then access them with your iOS device or your PC anywhere you have an Internet connection.  The problem with DropBox is that it does not allow you to modify the files from your iOS device.

Another iOS app that works with your Dropbox account is CloudOn. The CloudOn app gives you a desktop that allows you to access your Microsoft Office documents.  The app let you view and modify your Word, Excel or PowerPoint files on your iOS device and saves them to your DropBox account. The files are automatically updated on your laptop or PC at home through the Internet. The interface is shown below.


Another way to deal with your Microsoft Office files is OnLive Desktop.  This app is fairly new and was just released on January 13th. OnLive, as most of you know, has a very popular game streaming site.  They soon realized they could stream anything, even a Windows Desktop. That is exactly what you get as shown below.  This app is free with 2GB of storage. Check our the other data plans on their site.


When you log into OnLive Desktop you will see a actual Windows desktop with icons for Microsoft Word, Excel, PowerPoint and a Recycle bin. This desktop allows you to create or modify files on your iOS device and save them to the OnLive Cloud.  To access your files on your PC or Laptop, simply access their website and login.

If your not comfortable with this whole weatherless Cloud thing you could use Splashtop Remote.  This app allows you to securely connect over the Internet to your laptop or desktop at home.  You will have to install the Splashtop Streamer on your PC to connect your PC to the remote iOS device. With a secure user and password the app will bring up your desktop just like you were sitting there in front of your PC. You can run any application on your PC remotely over the Internet on your iPad.  If you needed to modify a Microsoft Office file you can easily do that then email it to yourself. This app will cost you $4.99 but it is well worth it.

It is a strange new world out there pilgrims. Embrace the Cloud and enjoy the flexibility and freedom Cloud computing can give you!

Monday, January 16, 2012

Contour Connect App

Application: iPhone, iPad, iPod Touch iOs 4.0 and later
Function: Bluetooth connection to Contour camera
Rating:**
Cost: Free


I recently purchased a new High Definition video camera to use while on vacation in the British Virgin Islands. I wanted a small camera I could use to catch all the action above and below the water while snorkeling or scuba diving. I decided to purchase the Contour+.  This is a small POV, point of view camera.  These are rather new on the market and are being used by sports enthusiast to capture all their extreme action.  The camera can be mounted on almost anything with the variety of mounts included.  The company offers three different models at several different price points. The Contour display app will only work with the ContourGPS and Contour+ models.

The ContourRoam is waterproof to one meter and has a 170 degree field of view. The ContourGPS allows you to geotag your videos to show where they were taken. The Contour+ also has a GPS and HDMI output among other options. All three models shoot high definition 1080P and 720P video. See the comparison of the models for a full list of options.  The video is recorded on micro SD cards up to 32GB. This will allow you to capture hours of video in HD quality.

The Contour+ and the ContourGPS wirelessly connect to an iPhone and Android app that will allow you to view the camera frame and change the settings on the camera through a Bluetooth connection. The Contour+ has the Bluetooth integrated in the camera. A separate Bluetooth connection card has to be purchased for the ContourGPS model.


App Features:
  • Use your iPhone, iPad or iPod touch to preview what your camera sees before you record.
  • Review the battery and memory remaining on your Contour camera.
  • Change the camera settings in real-time including video mode, video quality, microphone, GPS, and lighting.
  • Receive the latest GPS Assist Now file so your Contour knows the latest satellite positioning.
Camera Features:
  • Each model has a few different features but all will share the same shape and for factor.
  • Removable battery is recharged using a standard usb cable connected to your computer.
  • Removable micro SD card storage up to 32GB of memory.
  • Records .MOV format video.
  • Rotatable lens.
  • Compact size with a variety of mounts to secure your camera.
  • Lightweight and compact they take up little space.
  • Includes a software video editing package for Windows or Mac. You can also use iMovie on your iPad to edit the video. The iPad camera connection kit will be needed to upload the video from the micro SD memory card.
Separate waterproof housings can also be purchased to extend the waterproof capabilities while snorkeling or scuba diving.

Here a few screen shots taken from the video camera.


Boaters will find many uses for these little underwater cameras.  Check out some of the great actions videos on the Contour site. You can use them for snorkeling, scuba diving to capture shots of the many fish and sea life below. Record you kids water skiing or wake boarding. Check out the underside of your yacht or take lots of great vacation and cruising video action.  These cameras are so versatile, compact and powerful you will want to have one on your next trip.  The Contour connect app only makes using the camera that much easier.