Saturday, February 25, 2012

MOBA Man Overboard

Application: iPhone, iPad iOS 4.3 or later
Function: Man overboard GPS
Rating: ****
Cost: $3.99

Man overboard is a serious problem at sea especially if your in open ocean miles from any help. The recent loss of life in the North Atlantic Rally for Cruisers event this years reminds us all to well.  On November 11th, 59 year old Jan Anderson was swept overboard in 30ft seas.

Most of us are familiar with Man Overboard buttons on our GPS or Chart plotter. At least we should be. Many people fall overboard and are never heard from again.  To prevent this tragedy from happening we first should all be wearing our safety harnesses, floatation devices and be tied to our yachts. If not, a Man Overboard app would help locate those foolish sailors.

If you don't have a chart plotter or GPS handy when you lose a crew member overboard, what do you do? One avid sailor Stephane Azzoni saw a need for a simple Man Overboard app called MOBA that could be used quickly and easily on our iOS devices. He worked with a Swiss company to develop the Swiss army knife equivalent of a Man Overboard app for your iPhone or iPad.  Your device will need to have the 3G option and GPS on board and you must have locational services turned on.

Features:
  • Small easy to use
  • One button activation
  • Compass heading magnetic
  • Distance in nautical miles 
  • Programmable Emergency phone call button
  • Time and GPS coordinates
The app is used by turning it on when you board your boat. It can then run in the background and be ready for implementing if you need it while underway. To activate the app simply tap the circular red button on the main screen.


The latitude, longitude, distance and time are shown for the target.  A compass dial shows you which direction to head back to your person overboard.

The Red power button will abort the MOBA operation. The Green phone button can be programmed with an emergency number. The application instructions are located by pressing the small i in the lower left side of the screen. The gear icon in the lower right will allow you to change the emergency phone number.

The author has made this easy and quick to use which is a necessity in a man overboard situation. The large dial lets you know which direction to head to pick up you overboard crew member.

This app can be use for other situations also. It could be used to mark a camp site so you can remember where to return to. If your shopping at the Mall of America you can set it to find your car in the parking lot.

Hopefully you will never be in a situation where you will need a MOBA app, but if you do, keep this one running every time you set foot on your boat. It will be ready to pull up and use if you ever need it.

~~~Sail On Safely~~~

Tuesday, February 21, 2012

Weather4D Pro

Application: iPhone, iPad, iPad 2 iPod Touch 4 Gen, iOS 4.3 and later
Function: Weather Data and Forecast Display
Rating: ****
Cost: $30.99


If you spend anytime on the water you become very aware of the weather.  I am always looking for tools to help me keep safe while on the water. Weather4D Pro will help even the novice become a professional weatherman. This app brings all the weather you will ever want into one app and allows you to display and analyze weather patterns and systems all over the world. The app's intuitive interface will make it easy to get the latest weather for your area and see predictions up to 8 days out.

Olivier Bouyssou is the mastermind and developer of the Weather4D PRO app.  He has recently updated it to a Pro model. Version 1.1.1 just came out February 5th and is jam packed with tons of new features and upgrades your going to love.

I previously reviewed the Weather4D app last April and have used it some over the summer. This version seems to be more targeted towards the nautical user who wants to do weather routing on longer passages across the worlds oceans. The integration and importing of GPS routes into the display allows this. If you don't need these routing features purchase Weather4D. Additional GRIB file options of importing, copying, saving and opening in other programs gives you more flexibility to use the weather files. You can also retrieve GRIB files via the Iridium AxcessPoint app with a satellite phone.

Weather  Data Features:
Cloud cover
CAPE (Convective Available Potential Energy)
Snow, Rain
Pressure
Wind direction and speed (10 meters above ground)
Temperature (2 meters above ground)
Waves, height, direction and period

Forecast Models Features:
Up to 8 day forecast
Data intervals 3, 12, 24hr
Global Coverage
Resolution .5, 1 and 2 degrees
Data updated every 6 hours

Display Features: 
GRIB file import in .rgb,grb.gz, Grb.bz2
Share GRIB files through the Open In" feature
Worldwide weather
Zonal setup
Temperature color transparency overlays
Isobar transparency overlays
Wind color and transparency overlays
Precipitation amount overlay
Adjustable cloud cover transparency
Wave transparency overlays
Download GRIB files through Iridium phones
Prediction passage of Iridium satellites
Request GRIB files with SailDocs by mail
Import of KML route files from iNavX for display on the forecasts

I ran the app on my iPad and I have to say the bigger screen makes it easier to see all the great features. The main displays is rich is color and detail and it provides the user a wealth of information.

The Main screen displays the map showing you the weather zone and data you want to display.  The Settings Menu is the second button from the right and allows you to customize the various Wind, Pressure, Temperature, Precipitation, Cloud Cover, Pictograms, CAPE and Wave data.

The various settings can be changed to read both English and metric settings.

To navigate around the maps select the Orbit mode icon in the lower left side of the screen. This lets you manually move the map around the world to view the area you would like.  Use one finger to pan left or right, and up or down to change the inclination. Multi-touch features are used for navigation around the maps.  Pinch to zoom, or spread your fingers to zoom out.

The Time mode clock icon in the lower right side of the screen allows you to step through time and watch the weather forecasts change. Use your finger to swipe left or right to go back or forward in time respectively.


Zones can be selected to show different parts of the world. Zones are set using the Zones button on the upper left side of the display.

Six zones are set up covering the main continents of the world. Additional zones can be added by defining custom areas. Here I have added a Midwest and Florida Gulf zone.

The Green radio indication to the right of the zone shows that it has current data. To update the data tap the recycle icon to the left of the zone.

GRIB weather files can be imported or downloaded for display in your zone.  To manually download, select the reload button next to the Zone to update the GRIB weather data. The radio button will turn Green when the data is done downloading.


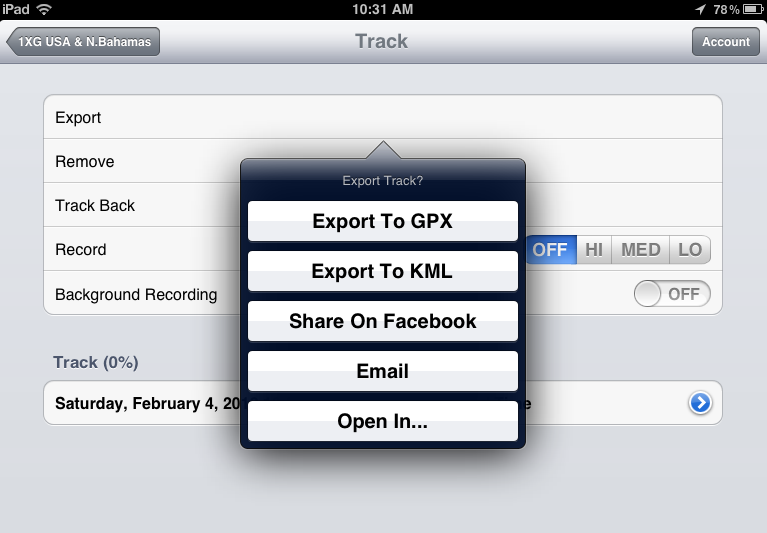
Weather4D Pro also allows you the options to Open the GRIB. Open In lets you import the GRIB file into popular programs like iNavX so you can display them on your navigational charts.

Additional options let you Send the GRIB files by email, Rename and Copy.


Route import is another added feature to Weather4D Pro. The author has made it possible to import a route file and superimpose it on the Weather4D Pro maps. 

The iNavX navigation and charting app has an Open In feature under Routes, shown at left. Select this then tap Weather4D for the program you want to import into.  Weather4D will open and show the new imported route successfully. 


You can then scan forward in time and see what weather you will encounter on your route. This is a very powerful tool and will let your plan your routes and make course corrections if needed to optimize your speed and safety at sea.

The route is shown as the yellow line with the red vessel at the top of the line.  There is an option in the Route feature to enter the average speed of your vessel so you can see the vessel's progress as you pan through time and the later weather forecasts.


The last great feature is the ability to download GRIB files from SailDocs. First select a zone and select the SailDocs Request.  This will then give you options of requesting the GRIB by Mail, from XGate or from AxcessPoint using the Iridium satellite phone.

If you select Mail it will take you to an email request form requesting the GRIB files from SailDocs. Hit the Send button and then check your email. The GRIB file will be an attachment to the email. Tap the attachment and it will give you an option to OpenIn, select this and Weather4D should be available as an option. The GRIB file will then be imported into Weather4D.

This same process can be used with an Iridium satellite phone and the AxcessPoint app to retrieve the GRIB files anywhere in the world. Weather4D also has a satellite tracking feature to estimate the time of the next satellite pass. This optimizes your connection time and download speeds of the weather data. Tap the screen once to bring up the weather feature icons. The Satellite icon will be at the bottom of the iPad screen. Select this to view the satellite mode and estimate the time of the next satellite pass.

Weather4D Pro has provided some great new features that your average GRIB display apps just don't have.  With the Route importing, GRIB file importing and satellite tracking, you now have a complete weather routing package capable of taking you across the oceans of the world.

~~~Sail On~~~ with Weather4D PRO

Wednesday, February 15, 2012

Garmin Bluechart Mobile App

Application: iPhone, iPad
Function: Marine Charting and Navigation
Rating: ?
Price: Free


Garmin International announced yesterday during the Miami International Boat Show that they have developed an iOS app for the iPhone and iPad to showcase their marine navigation software and charts. Garmin has been taking it's own sweet time entering the Marine app arena.  We have all been waiting patiently and will only have to wait a little longer.  Garmin plant to release their BlueChart Mobile app this summer.

I can't wait. I have used several Garmin products over the years and have found them be very well designed and functional.

The BlueChart Mobile app will allow the user to plan and create routes and waypoints on the iPad or iPhone and then transfer them wirelessly to their onboard Garmin chartplotter.  Real time navigation and plotting of the boats position on the charts can take place.  The app can also access the internet to provide real time weather information and overlays.

The app will bring the highly accurate BlueChart data that we have come to love on our Garmin chartplotters right onto your iPad/iPhone. Charts will show shaded depth contours and tidal zones with spot soundings and points of interest.

Garmin promises the ability to plan trips and view points of interest with access to the Active Captain Database.  Additional features allow you to keep track of weather conditions, temperatures, dew points, wind direction/speeds, radar and cloud cover. You will be able to graphically overlay all of this data on your charts. 


The app will use the same vector oriented data and seamless charts as their award winning chart plotters. The app is advertised as free with the ability to purchase charts for an additional cost.
 
Garmin also talked about the ability to network the iPad app with your onboard Garmin chartplotters. I understand that you do not need to have Garmin hardware to use the app but if you do, there is some added functionality. This will most likely be the ability to transfer data to and from your yacht's chartplotter.

I received an email today from the Active Captain group announcing their collaboration with Garmin to supply the Active Captain points of interest database in the app.  They are understandably excited and promised the same great service even with the expected increase in users. With all the new Garmin users, they expect their traffic to double from what it is now.  Active Captain plans to synchronize the database with the Garmin servers so the app will not load up the Active Captain servers. The BlueChart Mobile users will communicate directly with the Garmin servers. See the Garmin press release.

The Active Captain database will give all the BlueChart Mobile user an easy way to search for and find marinas, anchorages, fuel stops, restuarants, supply stores, hazards and a ton of other user generated marine information.

I can't wait to see this app in action. If you own a Garmin GPS or chartplotter it should be a seamless transition to using this app. When it does come out, I promise to bring you all the details.

~~~Sail On~~~

*All images from Garmin

Saturday, February 11, 2012

iNavX - Part 4 Instruments and NMEA Data

This is part 4 of a tutorial for iNavX. We have covered quite a bit in our previous posts so check them out to get up to speed on this great app.

This app is not only a great charting app but it has an extensive instrument display package built in.  Many of us have instruments on our boats.  The power of this app is that you can put access to that instrument data in the palm of your hands anywhere on your yacht.

The app will display data from the on board Location Services of your iPad or iPhone or from your boats WiFi TCP/IP connection. Locational services can be turned on by selecting the Settings icon in your iPad or iPhone. The app will then use the internal GPS and locational services. If you want to know more about how Locational Services works, please view the following article from by Glenn Fleishman from MacWorld.  He has forgot more than I will ever know about the iPad.

One of the most important features of the app is the ability to receive NMEA data using TCP/IP and display it as instrument data.  A computer or a WiFi multiplexer running a TCP/IP server can broadcast any type of NMEA data that is connected to it. 

iNavX will accept two types of instrument data. Most of us are familiar with the the original instrument protocol, NMEA 0183. The app is also able to display NMEA 2000 data which is the newest supported protocol by most marine manufacturers.

iNavX has a user guide which displays the NMEA 0183 sentences, NMEA 2000 PNGS and datum supported by each communications protocol. The complete table can be found here. It is very extensive so I did not repeat it here.

The NMEA 2000 supported PNGS offer a few more monitoring data points in addition to most of the NMEA 0183 monitored values.

Now that we know what we can display, let look at the app and see how we do it.

On the main Chart display you will see Instruments as one of the main soft keys at the bottom of the screen. Selecting this brings you to the instruments display.

If you have Locational Services turned on in your device some data will show up. Course information will include Heading(HDG), Rate of Turn(ROT) and Speed Over Ground(SOD).  Position information will include Altitude(ALT), Connection Type(CON), Horizontal Position Error(HPE), Latitude(LAT), Longitude(LON), Universal Time(UTC) and Vertical Position(VPE) accuracy.

Tapping one of the instruments will bring up a pop up window to highlight the data. This pop up can be set to display either digital or analog instruments.

The main Instruments Display shows a list of active data being displayed from Locational Services or a TCP/IP connection. I will show how to set up a TCP/IP connection later.

The image to the right shows the Locational Services data from my iPad.  Individual instruments can also be selected here to display either digital or analog displays.

Here you can see the Heading(HDG) pop up showing the analog compass in addition to the digital heading display. If an optional display is available a gray arrow will shown on the right of the digital display.

On the Instruments display, you will see a gear icon in the upper right corner of the display. Selecting this will bring up a pop up window showing you the instrument settings.


You will see the complete list of  available data and the ability to enable or disable the display of the instrument. The data will only be displayed if the switch is toggled to "ON" and the device is receiving that type of data through Locational Services or a TCP/IP connection.

The pop up window only shows a few of the many available instrument types available for display. Page down to see the rest.

The instrument display can also be reached through the iNavX screen or viewed on the Chart display in the instruments banner.


The instruments banner is a convenient way to view the data along with your real time position on the Chart Display and the compass banner on the top of the display.

Tapping one of the instruments in the banner will bring up a pop up window showing the digital or analog display of the value.  A setting in the instruments display will allow you to set either analog or digital instruments.

This feature is helpful to highlight the Depth instrument while you navigate a shallow area or bring up Speed Over Ground (SOG) while you are racing in a regatta to maximize your performance.


One of the most powerful features of the Instruments package is the TCP/IP capability.  In the Instruments Settings pop up you will notice a gray TPC/IP button on the upper left side of the screen.

Select this for an additional TCP/IP settings window. The Host setting will be the IP address of the device broadcasting the NMEA data. The Port number must match the port of the host TCP/IP server. In this case I am using Franson GPS Gate  software on my laptop with port number 20175. More on setting up GPS Gate later.

The Bookmarks icon in the upper left corner brings up a list of previously used Hosts and Ports. This is handy to save the most recent settings.

The Account button will allow you to log in to an Automatic Identification System (AIS) server if you have subscribed to one. SiiTech is one popular site providing ship positioning using the Automatic Identification System AIS data.

The Disconnect Alarm will warn you if the TCP/IP connection is lost. Enable Waypoints allows you to import and navigate to active waypoints or routes of your NMEA data server or software. This feature will not work with Locational Services. Turning the Locational Services selection ON will use the position, speed and course of the device. You will see this data highlighted in yellow on the bottom display.  All other NMEA data coming from the TCP/IP connection will continue to be processed and shown in green.

iNavX can connect to a computer or a WiFi multiplexer with the TCP/IP settings to provide instrument data to your iPad or iPhone. One simple way to connect to your on board laptop is through an adhoc connection. Adhoc connections use the WiFi card in you laptop to connect the iNavX app.

Setting up an ad hoc network is fairly easy. For Windows 7 See below.
  1. In Windows 7, open the Network and Sharing center by clicking the WiFi icon in your system tray.
  2. Select Open Network and Sharing Center on the bottom of the pop up.
  3. Select Setup a New Connection or Network
  4. Select a Set up a Wireless ad hoc (Computer to Computer) network and select Next
  5. You will be prompted to create a Network Name, Security Type and Security Key.
  6. Click the Save Network box if you want to use it again at a later date.
  7. Select Next and the network should show up in the list of available wireless connections.
  8. Select the new connection and select Connect. It should say waiting for connections.
  9. Go into iPad or iPhone Settings menu under WiFi and you should see your new network listed under Choose a Network. Select the network to connect.
The iNavX app will need the IP address of your computer. In Windows 7 it is found under the Network Connections setting. Search for it in Help and Support if you cannot find it.
  1. Open Network Connections. Use help to Help and Support to search for it if you can't find it.
  2. Select the active network connection you created earlier, double click to bring up the status of this connection
  3. Click Details.  Your computer's IP address appears in the Value column, next to IPv4 address.
The iNavX website has several tutorials on connecting numerous types of software and WiFi hardware devices. Please check these out for the device or software your connecting to. Many new devices are being developed to provide NMEA WiFi data on boats.

In this test I used Franson GPS Gate software on my laptop and a USB connected GPS to provide data to the iNavX software. GPS Gate is fairly easy to set up and broadcast any NMEA data you may have on your PC to the iNavX app. It also allows setting up virtual com ports that let you connect to multiple pieces of software with one GPS source. Run the Setup Wizard to find the Input data source. The Wizard located the com port that the GPS is connected to. In this case it found it on COM5.
Select the Output tab in the GPS Gate software. Add the TCP/IP address of the laptop here and select a port number. With the IP address and Port number put into the GPS Gate program and the same IP address and port entered into the TCP/IP setting of the iNavX app we should be ready to communicate.
Go back to the iPad and the iNavX app. Now select the Link button to turn the connection ON.  Green highlighted data will start streaming into the the black window on the display. Going back to the Instruments page you will see under Connection (CON) that it now says TCP/IP. This will verify that the data is coming from your laptop.

It takes a bit of work getting all the pieces put together to make the TCP/IP NMEA data work. Once you do it is amazing to see that data streaming to the device.  Not many other apps have the ability to do NMEA data streaming to the level that iNavX does. Sit down and give it a try, if you have problems give me a shout I would be glad to help.

Monday, February 6, 2012

iNavX Part 3: Routes and Tracks

In part 1 of the tutorial, I covered "Getting Started with iNavX". In part 2 I showed you the many features of the the main iNavX Chart display. I also showed you how to create and edit Waypoints in several different ways. In this 3rd session I will cover the creation and editing of Routes and Tracks.


Routes:

A route is simply a collection of waypoints that make up the path to your destination. To create a route select the Route soft key at the bottom of the main Chart display.  On the route display you will see a + sign in the upper right hand corner. Selecting this will take you into the route creation and editing page.  The new route will be given an name like RT001. You can change the name of your route by tapping your finger in the route name field and typing in the new text. Here I have renamed the route to Cape Coral - Naples.

Next we need to add some waypoints to define the route. This can be done on the main Chart page or in the route creation display.

Lets first use the routes creation display.  Select the Routes soft key, you should now see the Cape Coral - Naples route listed.
Edit this route by tapping anywhere on that line and it will take you to the route editing display. You can start adding waypoints by tapping the + sign on the upper left side of the screen.

A list of waypoints will come up for you to select from, tap on the waypoints needed to create the desired route.


Another way to create a route is to do it graphically on the Chart display. First we need to select the route and make it active. Go to the Route page and select Cape Coral - Naples by tapping the greater than sign in the blue dot on the right side of the screen.  A pop up will show that it has been selected.

Next go back to the Chart display and create the first waypoint with a single tap near Sanibel Island. Tap the green marker in the upper right corner of the popup to create WP0001.


Next, double tap the waypoint name and a pop up window will give you the options of More Detail, Goto WP0001, Add WP to Route: Cape Coral - Naples, Edit Waypoint, Zoom In, Zoom Out and Maps.  We want to select the second option Add WP0001 to Route: Cape Coral - Naples.  Selecting this will add the waypoint to the route.

Single tap to create waypoints 2, 3 and 4. Double tap to add  them to the route.  This will take us down the coast to our destination which is Naples.

You will notice that a dashed blue line connects the waypoints from start to finish.


To navigate to the first waypoint in the route, select the GoTo button on the upper right side of the route edit display. A solid blue line will be shown on the chart from your current position to the first waypoint.


You will now see a red dot over the Waypoints soft key and the first waypoint on the chart display will also be highlighted in red.  The route will automatically advance to the next waypoint in the route if the boats position is within the arrival distance of the waypoint. If the arrival distance is set to None no automatic advancement will occur. You can manually advance to the next waypoint by selecting the Next button in the Routes display.

When a route is active, the waypoint being navigated to will have it's bearing, time to go, distance and crosstrack error displayed in the Instrument banner.  A solid blue line will show the track of the vessels current position to that waypoint.

To backup and protect all your waypoints and routes, iNavX has the ability to Import and Export your data to your X-Traverse account.  This is basically Cloud storage for your waypoints and routes. You will need to sign up and purchase an X-Traverse account on the Internet for $10.  Enter your account login and password in the iNavX app under Preferences.
The Import/Export function is on the Waypoints display.  Selecting this will give you the option of several file formats to export. You can export or email in GPX, KML and KMZ formats.

Learning to create and edit routes is key to making the most of your iNavX app. Spend some time practicing creating waypoints and routes and saving them to your X-Traverse account.

Tracks:

Tracks are simply a digital recording of the path that your vessel has taken over time.  iNavX will record up to the last 500 miles traveled. To start Tracking select the Track soft key at the bottom of the main navigation display. The Tracking display has the options to Export, Remove, Track Back, Record and Background Recording options.

Export allows you to download your tracks to your X-Traverse account in a GPX or KML file formats. Tracks can also be exported to Facebook, email or opened in iNavX.  This is a fun way to share your adventures with your family and friends and backup you tracks. Your Facebook account will need to be linked to your X-Traverse account under Preferences. An Account button also exists on the top of the Track display. Use this to link your Facebook account.

The Remove option is the way to delete unwanted track logs. Track Back is a powerful tool that allows you to create and navigate to a track back waypoint. This allows you to navigate back on the track you previously traversed. 

To start Tracking select Hi, Med, or Lo in the Record section. To stop tracking select Off. The Hi setting records up to 50 NM at the highest resolution. Med records up to 250 NM and Lo records up to 500 NM. The recorded tracks and statistics for those tracks are listed below on the Tracks display.

Another neat feature is the Background Recording. Even with with the iNavX app suspended it will continue to record track information. Make sure to have your device plugged into power, if not, it will drain your battery rather quickly.  This feature will only work with the devices Location services.

I hope you are following all of this. If you have any questions, please comment.  As you can see, Routes and Tracks are two powerful tools that iNavx has to help you navigate. My next post will cover Instruments.  

~~~~Sail On~~~~~

Sunday, February 5, 2012

Iridium AxcessPoint Mail & Web

Application: iPhone, iPad, iPod Touch
Function: Iridium Satellite WiFi
Rating: ****
Cost: Free

Sailors at sea used to be disconnected and isolated from family, friends and business ashore. The satellite communications systems have changed all of that. One company that has been at the forefront of satellite telephone communications is Iridium. Most people know it as a satellite telephone company. They have been in business for years and have recently added products for tracking and monitoring, data and voice services, modems and modules for personal tracking and monitoring systems.

The Iridium Axcess point will literally create a WiFi hotspot anywhere in the world. The Axcess point connects to your Iridium satellite phone with a USB connection and allows you to access email and the Internet. The two phones that it works with are the Iridium 9555, about $1000.00 and the Iridium Extreme, about $1500.00.  You will also need a subscription and data services. There are usage charges that are billed per minute which start when you connect to the Internet. This is, at last, an affordable way to wirelessly connect your iPad, iPhone or laptop to the Internet anywhere in the world. A basic Iridium satellite phone will cost  you around $1000.00 The Axcess point will run another $175.00.

The AxcessPoint Mail and Web app will seamlessly connect your iOS device to your Iridium Axcess point wirelessly. You can then send and receive batch emails and access a low band Internet connection.  You will also be able to download weather data and GRIB files to use in weather programs like Weather 4D or iNavX.

Login with your user name and password for your Iridium email and Internet account.

A few easy setup screen allow you to make the connection with the Iridium Axcess point or modify the configuration setting and trouble shoot the connection.


Additional setting for the servers and ports. It looks pretty straight forward and should be pretty much plug and play.


This system is fairly new and I do not have any world traveling plans at this time.  I wish I had $1500 to spend and a trip planned to the Caribbean so I could give it a try.  Does anyone have any experience with the Iridium Axcess point?

Thursday, February 2, 2012

iNavX Part 2: Chart Display and Waypoints

This is part two of a tutorial for the marine navigation app iNavX. I have owned the app for about a year and have explored most of its functions and features.  Each new release seems to brings more features and added functionality.

In this post I want to cover the details and functionality of the Chart display interface and show how to create and edit Waypoints.
 
Chart Interface:

The chart interface contains a series of banners and bars to facilitate navigation around the app. These are overlayed on the chart that you presently have selected for navigation. On the bottom of the screen you will find soft keys for Charts, Waypoints, Routes, Tracks, Instruments, Forecasts and Guide.  On the top you will find a compass and instruments banner. Other navigation features on the screen are a + and - sign for zooming in and out of the displayed chart.

An icon in the middle right side of the screen has two blue arrows.  This allows viewing of the chart in full screen.  Tapping this will make the top menu banner and the bottom soft keys disappear, hit it again and they return.

On the top left side of the instrument banner you will also see a small blue dot with a greater than sign.  Tapping this allows you to either display or not display the compass and instrument banners. On the upper right side of the instrument banner is an lower case i in a gray dot.  Selecting this allows you to bring up the settings window for the instruments as shown in the image to the left.

In the instrument banner you can swipe left and right with your finger to see additional instruments. Multi touch functions of pinching in and out will zoom the display in and out.


On the top right side of the gray chart banner you will see a gear icon.  Selecting this will take you to the chart display settings. Here you can modify viewing, position and color of many items on the chart display.

Settings for Icons, Velocity vectors, night vision, waypoints, routes and tracks can all be set.

The "Long Tap New Waypoint" feature can be turned on or off here also.


In the lower right side of the display there is another lower case i, selecting this will give you information about the chart on display.

Here you can select the chart options for removal, updating, emailing, Tweeting, printing and opening the chart as a PDF file.


Waypoints:

Waypoints are the building blocks of navigation and the routing function within the app. In iNavX there are several ways to create waypoints.

The first is to simply tap the chart once where you want to place a waypoint. A small window will then pop up with options of More Detail, Goto, Zoom In, Zoom Out and Maps. On the upper right corner of the window you will see a green waypoint maker icon. To place the waypoint at this location tap this icon. You will then notice that the waypoint will appear on the screen with a name like WP0001. If you want to move it simply tap the waypoint name on the screen until it highlights grey and then move it around to where you want it. Tapping it a second time will bring up a menu to go to the waypoint, add it to a route, edit it, zoom in and out or map it.

Another way to create a waypoint is the use the "Long Tap New Waypoint" function. This has to be enabled in the chart view setup by selecting the gear icon in the top right of the display. To use the function simply tap and hold for 2 seconds and a new waypoint appears on the chart.

This may seem like a lot of detail but it will become second nature when you start adding waypoints and building routes.

The third way to create a waypoint is to hit the Waypoints soft key at the bottom of the display. The Waypoints screen includes Import/Export, Remove All Waypoints, New Waypoint and Port Search. On the bottom you will see a list of waypoints.

Import/Exports is a way to save or retrieve your waypoint and routes with your X-Traverse account. Your email and password for your X-Traverse account must be entered in the Account view under Preferences. You will need an internet connection to transfer the data to and from your account.

Remove all waypoints is pretty self explanatory. Selecting this will wipe out all your waypoints. Your are prompted again asking if you want to remove them, if so, select "Yes".

The New Waypoint selection will create a new waypoint near your present position. This new waypoint "pop up box" includes several options.

You can change the waypoint name by selecting the Name field and typing the new text. Actual latitude and longitude can be entered if you know the GPS coordinates.  A short description can also be added.  Hit the Position button to use your current position. The Lock button allows you to lock it from deletion until unlocked.  Show can be switched on or off to display the waypoint on the chart. The Arrival button allows you to set the arrival distance setting. If this waypoint is used in a route and you are within the arrival distance the app will advance to the next waypoint in the route.

Scroll to shows the waypoint on the Chart view display. The Camera icon in the upper right corner allows you to take a picture or use a picture from your devices camera roll and attach it to the waypoint. Open in Maps will bring up the waypoint and allow you to view it in Google satellite, street maps or both. You will need an Internet connection to display the Google maps.

The Goto Button, when selected, starts the navigation from your current position to the selected waypoint. iNavX shows a solid blue line on the chart display and shows the bearing, distance, crosstrack error and time to go in the instrument banner on the top. 

Another great feature on the Waypoints page is Port Search.  Here you can search for a marinas, points of interest, resorts and navaids. Selecting the Position button on the top of the page will list all locations within 50 miles. This feature will only work with the Navionics charts. The NOAA charts will not have this data. The data base is local so no Internet connection is needed for the Port Search.

As you can see, iNavX has a very full featured chart display and waypoint functionality. They seem to have thought of everything.  You can see why it is one of the most popular charting and navigation apps out there.

Next time I will cover routes and tracks. Stay tuned!