 In part 1 of the tutorial, I covered "Getting Started with iNavX". In part 2 I showed you the many features of the the main iNavX Chart display. I also showed you how to create and edit Waypoints in several different ways. In this 3rd session I will cover the creation and editing of Routes and Tracks.
Routes:

Next we need to add some waypoints to define the route. This can be done on the main Chart page or in the route creation display.
Lets first use the routes creation display. Select the Routes soft key, you should now see the Cape Coral - Naples route listed.

A list of waypoints will come up for you to select from, tap on the waypoints needed to create the desired route.

Next go back to the Chart display and create the first waypoint with a single tap near Sanibel Island. Tap the green marker in the upper right corner of the popup to create WP0001.

Next, double tap the waypoint name and a pop up window will give you the options of More Detail, Goto WP0001, Add WP to Route: Cape Coral - Naples, Edit Waypoint, Zoom In, Zoom Out and Maps. We want to select the second option Add WP0001 to Route: Cape Coral - Naples. Selecting this will add the waypoint to the route.
Single tap to create waypoints 2, 3 and 4. Double tap to add them to the route. This will take us down the coast to our destination which is Naples.
You will notice that a dashed blue line connects the waypoints from start to finish.


When a route is active, the waypoint being navigated to will have it's bearing, time to go, distance and crosstrack error displayed in the Instrument banner. A solid blue line will show the track of the vessels current position to that waypoint.
To backup and protect all your waypoints and routes, iNavX has the ability to Import and Export your data to your X-Traverse account. This is basically Cloud storage for your waypoints and routes. You will need to sign up and purchase an X-Traverse account on the Internet for $10. Enter your account login and password in the iNavX app under Preferences.

Learning to create and edit routes is key to making the most of your iNavX app. Spend some time practicing creating waypoints and routes and saving them to your X-Traverse account.
Tracks:
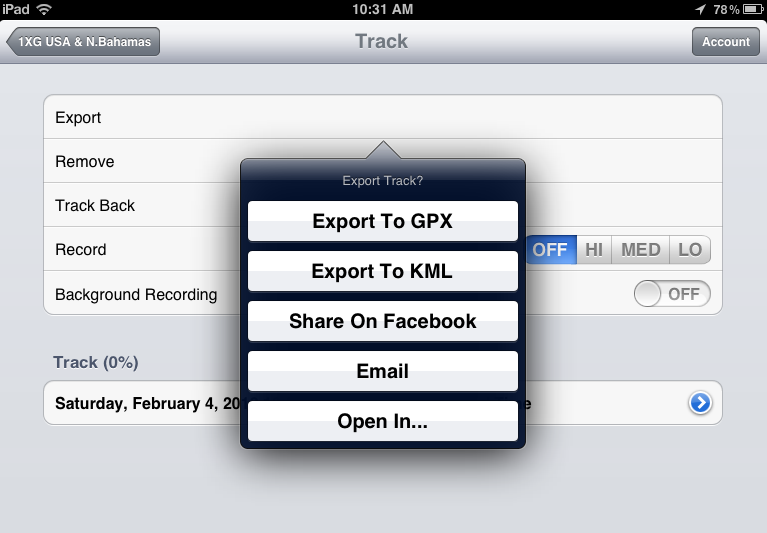 Tracks are simply a digital recording of the path that your vessel has taken over time. iNavX will record up to the last 500 miles traveled. To start Tracking select the Track soft key at the bottom of the main navigation display. The Tracking display has the options to Export, Remove, Track Back, Record and Background Recording options.
 Export allows you to download your tracks to your X-Traverse account in a GPX or KML file formats. Tracks can also be exported to Facebook, email or opened in iNavX. This is a fun way to share your adventures with your family and friends and backup you tracks. Your Facebook account will need to be linked to your X-Traverse account under Preferences. An Account button also exists on the top of the Track display. Use this to link your Facebook account.
The Remove option is the way to delete unwanted track logs. Track Back is a powerful tool that allows you to create and navigate to a track back waypoint. This allows you to navigate back on the track you previously traversed.
To start Tracking select Hi, Med, or Lo in the Record section. To stop tracking select Off. The Hi setting records up to 50 NM at the highest resolution. Med records up to 250 NM and Lo records up to 500 NM. The recorded tracks and statistics for those tracks are listed below on the Tracks display.
Another neat feature is the Background Recording. Even with with the iNavX app suspended it will continue to record track information. Make sure to have your device plugged into power, if not, it will drain your battery rather quickly. This feature will only work with the devices Location services.
I hope you are following all of this. If you have any questions, please comment. As you can see, Routes and Tracks are two powerful tools that iNavx has to help you navigate. My next post will cover Instruments.
~~~~Sail On~~~~~
Hi Mark,
ReplyDeleteGreat info and great layout of your blog!! I have the Navionics App, but am frustrated with its limted capibility and especially no track-up feature. I really like when I plan a route it will tell me total fuel based on pre-set boat cruise speed and fuel burn. Does iNavx have something like this? Thx-Donny
Donny,
DeleteThanks for checking out the blog and I am glad you find it helpful. iNavX does not have a fuel burn estimator, but it will display your actual fuel rate and fuel level if you have that instrument on board connected to a NMEA 2000 network. It has a NMEA 2000 display point for FLR which is the Fuel Rate datum.
I like both of the apps. Navionics is quick and easy to use while iNavX is a little more involved in getting set up if you need the advanced features. It all depends what your using it for.
Stop back soon, more great apps are on the way!
~~~SailOn~~~
Mark
Hi Mark,
ReplyDeleteNice tutorial. It is easy to read and the screen shots are very helpful. My Admiral (Wife) and I are out cruising. We've been out for 2 and a half years now. We love using the iPad as the cockpit chart plotter. We are also using the Navionics app and like it but we really need to see the AIS output on the iPad. Also I would like to be able to share the routs between MacENC and iNavX without and internet connection. Where we cruise an internet connection is a luxury and usually found only in port. Often, because of weather I need to modify the route underway. Is there a way using and ad-hock WiFi setup?
Thanks in advance.
Salty Doug Simms
Doug,
DeleteGreat to hear from you and nice to see your living the dream. Alot of people say that the iPad is not ready for the primetime cruising environment. I would like to hear more about how you use it and keep it charged. Do you have a special case or enclosure to keep it dry?
Do you want to display AIS data in iNavX? That is done by setting up an ad-hock network with your computer. You will first need your computer connected to your boats network.
Your question is a good one, that would be a nice feature to have. I am not familiar with MacENC so I am not sure if you can transfer files between iNavX and MacENC. I will do a little research and see if I can come up with an answer.
Keep in touch and stop back soon.
Mark
Doug,
DeleteFound a post on the macsailing forum discussing this issue. Looks like there is no way to transfer routes back to MacENC without X-Traverse and the internet. Transfering from MacENC to iNavX using the TCP/IP is explained here.
http://www.gpsnavx.com/iNavX/help/macenc.htm
Hope this helps.
Mark
Hi Mark,
ReplyDeleteThanks for the quick replies. I did see the instructions for MacENC after I posted to your blog. I will probably make changes on the Mac then upload them to the GPS and iPad. Although, if there are rough seas I would rather not go below for very long, if you know what I mean.
To answer your questions:
I have a RAM mount in the cockpit that will hold an iPad with a water proof cover. However, the cover does not allow for a power connection and the iPad requires power when the display is on all the time so I haven't use the cover since Nov. 2011.
I purchased the 3G iPad which has the GPS built-in. (It is not clear from the Apple website that the WiFI version does NOT come with a GPS.)
It works very well as a cockpit chart plotter. It is mounted under the dodger so it is visible during the day on full brightness and with it dimmed all the way down it is useable at night. I would prefer a dimmer screen when there is no moon.
I am using the Navionics program & charts and using the squeeze-spread gestures for zooming and a finger for panning so it is much easer to use than any other chart plotter made.
ONE last question:
I do hope iNavX uses the squeeze-spread gestures for zooming and a finger for panning. Is that true?
Best.
Salty Doug
Doug,
DeleteThanks for the info on using the iPad for cruising. I find more and more people are using it to replace not only their chart plotter but many other devices on board like laptops, cameras and instrument displays. For the price, you could go through several iPads and still be money ahead.
I have the 3G iPad 2 and purchased it for the internal GPS also. Works great with alot of navigation programs.
iNavX does use multi-touch gestures as you described. It has all of the Navionics functionality and more. Where are you guys cruising?
~~~Sail On~~~
Mark
Hi- Is there a trick to turning on the ipad/iphone gps while the 3g, 4g, and wifi is turned off? My old iphone would drain the battery trying to connect, if you left the 3g turned on away from shore. Sail fast! Live slow! Thanks. best regards, -chris
ReplyDeleteChris,
ReplyDeleteGreat to hear from you! Hope you enjoy the blog. Become a follower to keep up on all the new great apps. Support the site by checking out some of the great Google adds.
The iPhone and iPad 3 and 4G models have a GPS that can operate independently of the WiFi and Cell data services. It runs through locational services. The WiFi and celluar connections only help the GPS find a location quicker. Apple calls this assisted GPS. The GPS will work with WiFi and cellular data connections off.
Go to Settings/WiFi and turn it off. Go to Settings/General/Network and turn off your cellular connection.
I checked it out with many of my GPS apps and the still all work fine. Give it a try.
Hopes this helps
Mark
Chris,
ReplyDeleteI think I understand your question better. Turning off WiFi and cellular data does not turn off the cellular connection. The only way to do that that I know of is turn Airplane mode on. That kills everything. With Airplane mode turned off you can turn WiFi back on which seems to enable locational services and the internal GPS. I turned my WiFi router off and my apps seemed to give coordinates in this mode.
Check it out and let me know.
Mark
Turning airplane mode on is also necesarry if you want to connect to an external bluetooth gps which you can place in the cockpit.
ReplyDeleteSteps:
1. Turn airplane mode on
2. Turn external bluetooth gps on
3. Turn blutooth on ipad on
4. Turn wifi on
Kr Herman
Mark:
ReplyDeleteRelatively new to boating, and live in coastal CT. I have an 18' center console and enjoy trips up & down the coast (Westerly, RI, from Mystic, CT, etc.). There are many rocks/ shoals to look out for and have been looking for a reason to purchase an iPad besides web-surfing & e-mail checking. Which software do you recommend for relatively simple GPS/ Nav for power boating? Navionics for iNavX? Also, which signal if I'm moving fast (Cell, wi-fi, or 3G) would provide me with the most reliable real-time satellite feedback? I was considering the Garmin 541s, but would love the double-duty of the iPad. Thoughts? Thank you.
Try flytomap for 2 reasons:
Delete1. Great Price
2. Their webviewer(viewer.flytomap.com to check before you buy)
I used navionics which is good but expensive.
Shimspace,
ReplyDeleteNavionics and iNavX are both great apps. I think you will find Navionics easier to download and get started. iNavX has a greater variety of maps for download from their Xtraverse site. The price is about the same for either app on the iPad.
Navionics has a crowd source feature that allows other users to post local knowledge on navigation obstructions and points of interest
iNavX's strength is in the NMEA data and instrument display. I like the way they handle waypoints and routes better too. They both use the same charts so no comparison there.
If you are out on the water you will only be able to connect to the internet with a cellular connection. I you have an iPhone no problem. If you are buying an iPad make sure you bet the 3G or 4G model. These will have the GPS chip for navigation. You do not need a cellular connection to use Navionics or iNavX mapping and GPS functions. They use the locational services feature that accesses the GPS chip of the device. If a cellular connection is available it will improve the accuracy of the app.
Both apps are great, you won't be disappointed with either one.
Just used iNavX for the first time "in anger" during a three week cruise around the Hebrides (West coast of Scotland). I had hoped to record my track over the whole voyage (ideally in medium quality) but soon fell foul of the 250 mile limit. Apart from switching to low quality, is there any way that the software can be configured to hold more track data? (I have many gigs of free space on my iPad so I can afford to record lots more data than at present.)
ReplyDeleteTradewind25,
ReplyDeleteThe longest setting is 500 miles in the present software. Switch to the low setting to get 500 miles. Any other change would have to be requested of the app developer.
Ideally you should break it up into shorter legs recorded with separate track files. Why do you need it all in one track?
Mark
Hello Mark,
ReplyDeleteI am planning my next Bareboat charter in Gocek, Turkey using the iNavX. I am currently in Amman, Jordan.
Whilst in the Chart Mode and setting up WayPoints, the Chart keep re centering itself on Amman, Jordan. Is there any way to disable this re centering feature and continue to work on the Turkish Coast Line even though I am positioned in Amman, Jordan ?
Thanks
Hi Bashar,
ReplyDeleteI think there is a setting (button with the gear) in either the Charts screen or the Instruments screen that controls the View Centered on Boat. I looked in the tutorial and the settings pages are not up to date.
If you can't find the control, you could go to the the iPad Settings and disable Location Services while you are entering your Waypoints & Routes. (Double clicking the iPad's Home button switches between applications.)
Best.
Salty Doug
Hi Mark,
ReplyDeleteIn the Tutorial, the setting page screen shots are the same for Instruments and Charts. Are these screen shots up to date?
Best.
Salty Doug
Doug,
ReplyDeleteThanks for stopping back with the question. I have some screen shots of the instruments and charts settings in Part 2 of the tutorial, Chart Display and Wayponts. Screen shot 2 shows the instruments setting and screen shot 3 shows the charts settings.
http://i-marineapps.blogspot.com/2012/02/inavx-part-2-chart-display-and.html
These are two separate settings pages that can be reached using the Gear icon in the upper right of the screen. When you are viewing the chart page hit the gear icon to view the chart settings. When you are viewing instruments hit the gear icon for instrument settings.
Hope that helps
Sail On!
Mark
If you want to browse the chart without inavx constantly returning to your current position (living room), is it as simple as turning off the GPS?
ReplyDeleteHi Mark,
ReplyDeleteI have acquired an Ipad and navx, on recommendation of Practical Sailor's articles, to plan a trip to the Bahamas this winter, (Outside - Long Island, NY to Norfolk then ICW to Key Largo). I have successfully created waypoints and routes. However, when reviewing them I have difficulty when a route moves off one chart and onto another. At times I can click the edge of the chart and call up the adjacent chart and at times I click and do not get a link to the next chart. What's the trick?
Thanks,
Ralph
Ralf,
DeleteI have had others complain about the iNavX NOAA charts not being seamless. I only use vector charts when I use iNavX so I have not seen this problem. I would contact the developer or email them to see if there is a fix in the works.
iNavX is a great choice. But not all apps are perfect. I suggest bugging the developer to get the change made. If enough people complain things usually get done. The old squeaky wheel gets the grease saying.
Mark
You mention Tracks, but not how to activate them on the chart. Can you please elaborate?
ReplyDeletedshepard2,
ReplyDeleteSelect the Tracking menu option on the bottom of the screen. Start tracking by selecting a Hi,Med or Low option. Stop tracking by selecting OFF. Your tracking points will be listed at the bottom of the screen. Select a tracking point from the list that you want to see and a pop up box will display the tracking data with Date, time Lat/Lon, COG, SOG HDG, distance, average speed and elapse time. To display the track on the chart select he curved arrow icon in the top left of the tracking pop up. If you have moved a fair distance while recording your track it will show up on the chart as a dashed line. If you did not move it will only show the waypoint of where you started tracking.
Hope this helps. Consider becoming a follower of the blog to help support the site.
Sail On
Mark
As Mark pointed earlier in this thread, "iNavX's strength is in the NMEA data and instrument display." I have been scouring the web for information on iNavX instrumentation (specifically boat/tracking speed). It looks as if you need a TCP/IP connection to get the correct NMEA data which, by all accounts, would require you to have a WIFI system in place (via a laptop or WIFI multiplexer on board). Is there a way to get the NMEA data to run these instruments with only an iPhone...possibly utilizing 3G/4G connection? In short...is there a work-around to the onboard WIFI situation?
ReplyDeleteRunning a small fishing vessel in NYC area (always in cell range)
Anonymous,
ReplyDeleteThanks for your comments and question. The only way to get NMEA data from your boats instruments to an iPhone or iPad is via a multiplexer and a WiFI network or from a laptop with an AdHoc WiFi connection. I do not know of any work around at this point.
If no WiFi is available the iNavX app will use the iPhone or iPad's GPS and locational services to provide speed, course heading, altitude, latitude and longitude. A 3/4G connection is not even needed to do this. If you view the instruments bar in the iNavX it will show the CON: as Loc.Mgr. This is showing that WiFi is not connected and the app is using locational services. If you have WiFi and TCP/IP connected it will show TCP/IP in the CON: window.
The way it stands now, if you want to display data from your ships instruments you will have to invest in a WiFi and possibly a multiplexer setup. I talk a little more about some of the NMEA to WiFI options in this blog post.
http://i-marineapps.blogspot.com/2013/02/marine-data-to-wifi.html
Good luck, and thank for commenting. Become a follower of the site by selecting the Join this Site icon in the right column above.
Mark
Hi - I see that you state that Background Recording of tracks can eat up the battery fast. Can there be a little more detail on this? For an iPhone 5S, would it kill the battery in 1 hour? 4 hours? More? It would be very helpful to know this.
ReplyDeleteThanks
Corneian,
DeleteThe battery drain problem happens with the use of any of these GPS tracking apps. I have sailed up to 3-4 hours and have still had about 50% battery left. If you are going long distances you will need a charging source to keep your device working.
Some of these apps will continue to run in the background and will drain your battery if you don't pay attention to the usage.
Mark
For any free conversion tools to make gpx to kml and vice versa, I suggest trying this one http://gpx2kml.com/ which can offer fast conversion, with no need to install the software program.
ReplyDeleteApologies if this is a duplicate, as log-in failed half way
ReplyDeleteGreat blog and information, very helpful as I learn to use the iNavX
When cruising, the chart is always oriented north up. I'd prefer it oriented to my direction of travel, is there a setting that I can change to enable this capability?
Thanks
greg
Greg,
ReplyDeleteThere is a circle icon with an arrow in it at the bottom of the chart display. When it show a green outer circle it is North up. Tap it once and it should change to Blue and follow your direction on the chart. Thanks for the question. Make sure to to become a follower of the blog and share it with your friends.
Mark
I like the app alot. However, I'm having difficulties editing a route. I can add waypoints and rearrange them. But, for the life of me, I'm unable to delete them from the route page. The edit button does nothing.
ReplyDeleteHi I'm using iNavx on iPad and I'm very happy with!
ReplyDeleteHowever there are some functions I do not find there: Setting up my Course to Steer taking into consideration the info from the almanach such as currents and tides. Is that possible?
Bebs,
DeleteIf you set up a waypoint to navigate to, the app will automatically calculated the course to steer. Select the
Go To button and the app will calculate the course. It will also provide you the bearing and crosstrack error due to wind and currents. As long as you steer to the course you will get to your waypoint.
Hope this helps!
Sail On /)
Mark
ReplyDeleteI was very encouraged to find this site. I wanted to thank you for this special read. Thanks for sharing with us! Thanks a lot!
Click Here : 2006 Cat 140H (616) w/10365 Hrs For Sale at $98k
Just found your blog. Is there a way to edit track. I often forget to stop and start tracks so I get sections I do not need. I would like to delete sections. Using inavx in French Polynesia where tracks are very useful!
ReplyDelete